Wednesday, December 19, 2012

Update on all kinds of projects from the doll studio!

I am woefully behind on updates regarding what I've been doing in doll class, that's for sure! So here's an update. . .

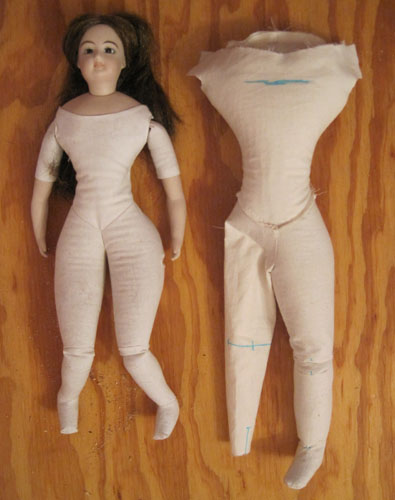
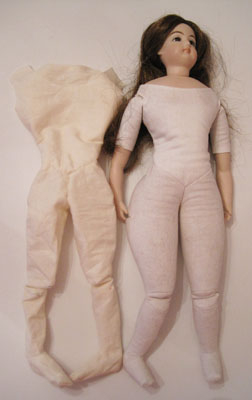
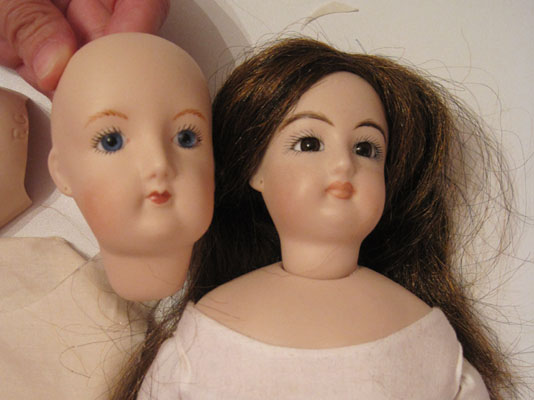
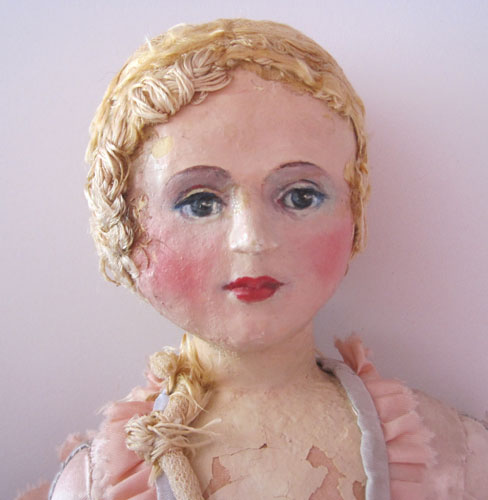
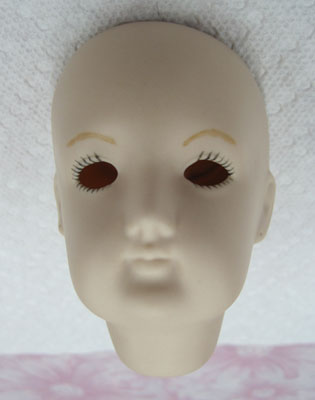
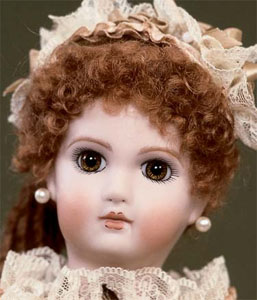
First, I finished a head for a second 18" FFD:


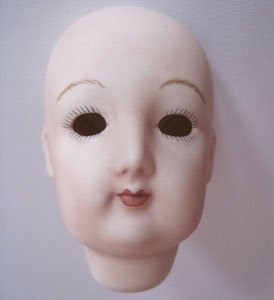
This doll is the same mold I used last time, but I did some things differently this time around. For one, instead of going with a pouring in a skin-like color, she was poured in white, and I did what's called a "wash" to give her skin a flesh color. Another thing I did was to outline the lips with a stronger red, in imitation of what was done on the antiques. I still feel I have a ways to go, but I'm pleased with how she turned out, in the end. (And no, I still haven't got a body, wig, or clothing of any kind on the first one! Therefore, this second one is likely to be a "floating head" for quite some time!)

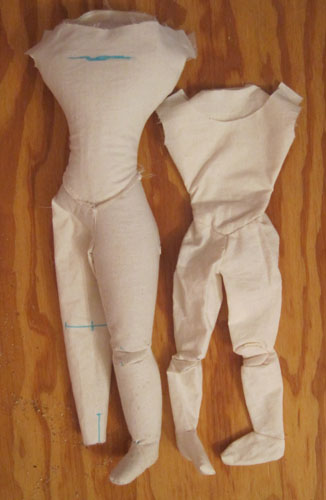
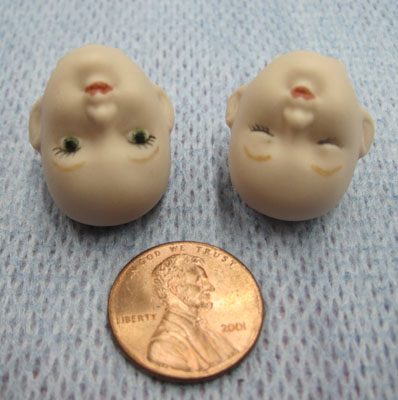
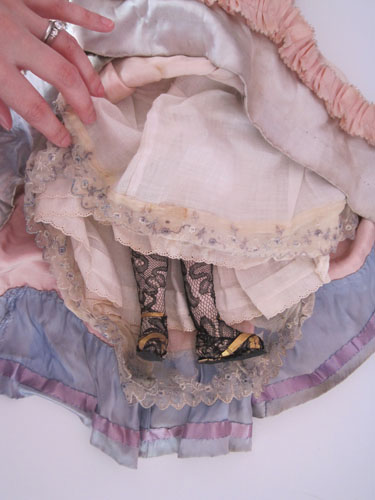
Next, remember those super tiny fairy heads? Well, they have their bodies now!


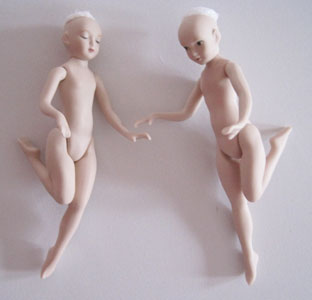
Of course, no clothing or wigs on these guys yet. . . Nor is there likely to be any time soon because in my head, they are Christmas fairies, and I've no intention of finishing them in time for this Christmas, so I'll bet they don't get finished until next year's holiday season!

But most recently, I've been taking a brief break from the dolls and making a couple of ornaments in class. Every year, a friend of ours hosts an ornament swap, and hand made ornaments are encouarged. I decided since this is the year in which I've learned to make things of porcelain, that a porcelain ornament was in order! And, that instead of making life easy and using decals, I felt the need to hand paint a design, LOL! I decided on snowman because I figured they'd be fairly easy to draw. They were a little tricky in that you can't put white over colors, so for the first firing, I was only able to paint the blue background, and so they looked like this:


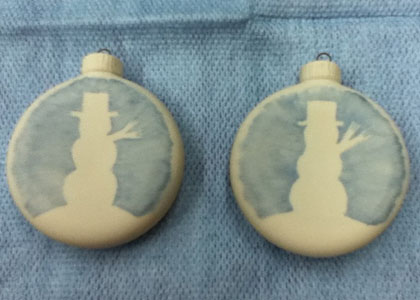
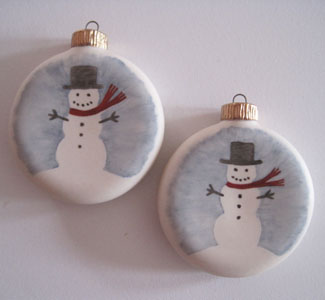
Then, over the next couple of weeks, I added the white, and then the details and the gold at the top (which has real gold in it!) I really hope they'll go over well at the swap!


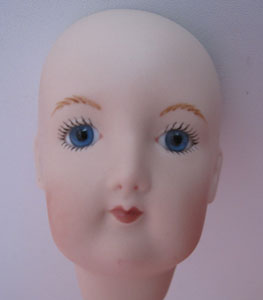
So that's the end of doll classes for this year. I started in February, so took classes for almost a year, and I ended up with three antique repro dolls (well, the parts for them anyhow!), two fairies, and two ornaments. . . Not too bad! When I start back up again in January, I'll be working on yet another French fashion doll, but this time, from a different mold. . .


Bell's MD2027, or "Renee," creates a 15" doll, so this one could be a friend for Fanny. And, I'll be up for a challenge since the smaller scale means a need for even more intricate brows and lashes. I'm going to have to come up with a brush that is way less full or I'll go nuts, ha ha ha!

So, just for the record, between the dolls I made this year, and the few I aquired already-made, we're now up to eight dolls who need to be clothed, and of these, five need bodies (or repairs/replacement parts), and three need wigs. Not to mention, I haven't made anything for Charlotte in forever, and she's still waiting on getting a nice 18c wig made for her. Yikes! It seems like my New Year's Resolution should probably be to punch out a bunch of bodies, wigs, and doll clothes! ;)

Sunday, November 11, 2012

Review of the Battat / Our Generation Baking Set

Okay, this one is only, like, eight months over-due in being blogged about, LOL! But, without further ado or delay, here is the "Baking Set."


There is a LOT of stuff in this set!


First off, everything you need to mix up something good, right?


Of course, it's non-functioning, but I like the fact that they put nice little decals and such on it that make it feel real.


And that they didn't cheese and just make the whole thing out of one hunk of blue plastic or something.


Look, your doll can make various cakes, or roll out and cut some sugar cookies!


And, for decorating, here are some shakers (maybe for pretend sugar/sprinkles?) and a frosting tube which I was surprised to find is actually cloth, with a plastic tip. Again, I'm impressed with the detail going in to these sets!


And, when the baking is done, it's time to feast on your creations! Included is a cupcake stand to display your cupcakes, cupcakes, plates, cups, and a pitcher.


There are a few paper/cardboard items that go along with the theme. . .


And, even a chef's coat and hat!


I felt it was pretty nicely made. Here is the inside of the coat:


Topstitching detail on the cuffs:


I haven't measured the Our Generation doll (I actually don't even have one!) but to my eye, they look thinner than American Girl. . . However, the coat fits!


And, the hat as well!


So. . . Adorable stuff, right? Totally! I do have a little complaint though, and here it is: You give me cake pans galore, and cookie cutters. . . But no cakes or cookies. . . And you give me cupcakes. . . But no cupcake tin. . . I just think that it might have been better if they'd had everything for making one (or maybe two) item(s), instead of random things. It's all super cute, but as a little girl playing with this, I'd have had more fun if I could pretend I was making the thing, from start to finish.

And to add to the confusion, here are two more items included with the set:


These sort of fall under cooking more than baking for me. . . Although, I suppose you could be using the spatula to lift the cookies off the cookie sheet. . . But oh wait, there are no cookies or a cookie sheet, LOL!

Now, if you've got some cash to plunk down, you can resolve most of these issues with the set. The Our Generation "Jenny" doll comes with a cupcake tin (and more cupcakes), so you could play-make cupcakes from start to finish. And if you REALLY have money to burn, the Our Generation "Gourmet Kitchen Set" also comes with cupcake tin and cupcakes. . . As well as baking sheet and cookies. (And so much other stuff and it looks so fun and OMG I WANT IT SO MUCH EVEN IF I'M "ALL GROWN UP"!!!)

*ahem*

The final verdict: Battat, you've done it again! The "Baking Set" is full of fun things to play with, and the quality is great. I still find it annoying that nobody really thought of the fact that you can't play-make one thing from start to finish, but, I guess I can overlook that because it's just all so cute. As a kid, I would have freaked out if I got this for Christmas, etc.! I imagine there's an awful lot of playtime with this one. So, this set gets an A- from me!

Saturday, November 3, 2012

Body pattern progress!

So you all know how I've whined about this doll body situation; about knock knees, ginormous back sides, and posture problems. Well, I've been working hard on making a body pattern that satisfies me. I molded a body out of clay to pattern my own body off of, I studied a crazy insane amount of pictures of extant French Fashion dolls in their birthday suits, and referenced assorted doll making patterns and books. And, at long last, I think I'm just about there!


(Sorry about the creepy one-legged thing going on; I didn't feel like making twice the gussets and doing all that stuffing when I could easily see if it would work by just making the one leg!) I just need to tweak the gussets a tiny bit, and to scale down/shorten the bodice area a bit (that's what all the markings are about), and I think she'll be good to go! And, with the head attached, she's almost exactly 18", which was the suggested height for this doll. Just to compare, here is the pattern that allegedly was created to fit her:


*rolls eyes* Granted, I altered that body a bit, but I did not alter anything that would have impacted the scale/height. Although I did lengthen the leg to go down to the foot, instead of ending above the knee, I used the porcelain part for this doll to add that length. She would have looked freaky on such a tiny body!

Also, check this out:


No more problems with ginormous back-side, legs that won't come near being straight, and bad knock-knee-itis! My new body can't sit, but she can perch, and I'm fine with that, because I think that's about the same mobility the original dolls had, based on the creases/signs of wear I see pretty consistently on them.

Guys, I'm so excited! Today I get to finally break ground on the actual body; not a test pattern, not a mock-up, not any other preparatory step. . . It's time for the real deal! And you know what that means? That some day very soon, I will get to start making tiny Victorian costumes for this gal! Hooray for that!!!

Wednesday, August 29, 2012

Current Project: Fairies

Just wanted to give a sneak peek of my current project at doll class:


These are some very small fairy heads! I was going to make them ornaments for the annual Christmas ornament swap we do with friends, but then I decided they're too fragile/costly, so I think I'm going to keep them, and not even put them on a tree.

So anyhow, this is what I'm working on just now. . . I think I will finish painting in the next class, and then it will be time to assemble bodies. . . All porcelain, no sewing, which is great since these things are so ridiculously small!

Tuesday, August 21, 2012

Random doll-making thoughts. . .

I had a pretty awesome doll-making class last night! Up until now, I'd really been struggling with making fine lines. In fact, the brows on my French Fashion head? I just sort of accepted that they would be clunky and ugly, because I didn't think I could get finer lines with my brush. Well, last night, I was faced with painting lashes on a doll head which can not be more than an inch tall (finished doll height will be something like 6", I think!) and so I was messing around with the brush, and found a way to get finer lines. I made the most delicate little lashes!

However, now? I need to make another French Fashion head, using my new fine-line-making-skills! Also, I've been studying extant doll heads and seeing other things I could have done differently to give her a more authentic-to-the-period look. I think the doll I made is pretty, but very modern, so for my next doll, I want to aim at getting a look that is closer to that of the originals.

But for now. . . How about making a body for this poor floating head? I thought that might be nice! ;) I'd already looked at a TON of French Fashion dolls, but now, I've gone back and really scrutinized the body constructions, styles, and shapes. My primary concern was the knock-knee issue, because my dolls have severe knock knees and they look ridiculous. What I found is that I had a really, really hard time finding even one French Fashion doll which had this issue, and when I did, it was very slight. So, I've come to the conclusion that the pattern I'm using is wonky somehow, and I feel confidant that I'll be able to fix this is my own body pattern.

The other issue I have is that poor Fanny can not stand up/lay down. She is stuck in the sitting position. I found this issue was consistant with quite a few surviving French Fashion dolls, so I think this issue will be a bit harder to tackle. It's a little less of an issue than the knock-knee issue, but still, if the doll is deeply into the sitting position, it's going to mean the dress isn't going to sit right, and she'll have to be basically hung on a stand, and you will not be able to see her feet at the base of her dress, which will be a bit weird. So I'm going to see what I can do about it.

Anyhow. I'm going to get a start at patterning the body today, but I'm not sure how far I will get since this seems to be a day of distractions. . . We'll see!

Sunday, July 22, 2012

Doll body pattern fail. :(

Ugh, I loathe making doll bodies, I really do!!! I didn’t start out that way. . . I started out thinking they were completely tedious (mostly because of setting in the gussets, which is the most miserable thing I’ve yet encountered in my 2.5 decades of sewing everything from corsets to curtains), but after now making three different body patterns, I’ve gone from slight annoyance to total aggravation.

First, it was Fanny’s body, which was some random 1980s pattern, and yielded the right height body, but it was knock-kneed, and had a huge rear. Then, the pattern for that “Marie Louise” doll I made in class, which was also about the right size (actually, as I look at her now, I think she’s too long-waisted, and her arms are therefore ridiculously long too) but severely knock-kneed. And now. . .


This may not look like tragedy at first glance, but it is, and I’ll tell you why: The body on the left is supposed to be for a doll that is three inches taller than the doll on the right (Fanny). To put it in perspective, here is a comparison of the two doll heads in question:


I’m using the pattern that matches the mold # of the doll head I made, so there is no excuse for it not to be perfectly sized. The only change I made to the pattern was that I added from the knee to the foot, but as you can see, the knee was already at the same level – if not shorter than – the location of Fanny’s. Also, I think the “larger” doll body is actually skinnier than Fanny’s, too! And, knock-kneed, AGAIN! UUUUUUGGGGGHHHHH!!!!! And I do realize porcelain shrinks when fired, so there’s a chance my head is slightly different in size than the head the pattern maker was working with, but. . . The fact remains that this body, at 13” tall, is nowhere near appropriate for an 18” doll – and that’s what the details about this mold claim the doll to be. So, it’s clearly just an improperly sized pattern.

Have I mentioned before that I have a zero tolerance policy for sloppiness in patterns? Well, I do. It’s because I think it’s sheer laziness when a pattern maker a.) does not make sure seams line up, and b.) does not do at least a mock-up, but better yet, a full-blown sample, of the pattern. If you’re not willing to do these two things, then you’re better off not publishing your pattern at all because all you’re doing is driving people to madness!!!

Okay, now that I got that out of my system. . .

Clearly, the only thing for me to do here is to craft my own pattern, from scratch, for these French Fashion dolls. It will come sized correctly for 12”, 15”, 18”, and 20” dolls (because those are the mold sizes I’ve encountered), all seams will line up, including gussets into their slits, and it will not be knock-kneed!!!!! And guess what? I’ll even test the pattern before I publish it. Novel concept, that. *rolls eyes sarcastically*

I don’t know when I’m going to become inspired to embark on that adventure, because the only thing I can think to do is mold a body somehow, then drape a pattern onto it, and work from there. . . And this seems like a huge amount of work. . . But in the meantime, I will work on attaching the head to the shoulder plate (need my Glennie’s help with that, as it’s a two-person job!) and then making a wig. Because I’m out of work and also as thrifty as any Scottish-blooded person you can find, I’m pilfering hair from an old Halloween costume wig, which I think is close enough in color to work:


And look! I was digging around in my box of doll parts (that really does sound so creepy!) and I discovered that when I was ordering pate possibilities for Fanny, I ended up with a cork pate that was too big for her. . . But is almost perfect for the new doll!


I’m pretty excited about having a cork pate, because it’s a nice solid foundation to pin the wig on to, (pinning the wig being a period way to attach the wig to this sort of doll, from what I’ve read).

So, this doll may not have a body, but hopefully she will at least soon be a well-coiffed floating head! ;)

Monday, July 16, 2012

The latest addition to my doll family!

I got an AWESOME surprise for my birthday from my amazing friend Sarah!!!


How perfect for me is she?!? She’s all in pink, and just so pretty! She has the most amazingly beautifully painted face:


I have no idea how old she is. She looks like maybe paper maché over a cloth body, and for some reason, I feel like maybe early 20th century? Her dress is very 1850s-60s in style, but her hair looks a little 18th century, which sort of makes me think someone was making a “period” doll.

She is wearing an adorable little pearl ring, which is so perfect because being a June baby, the pearl is my birth stone. :)


Even under her things she is lovely and unique, with all sorts of pretty lace trims!


So there she is, the newest addition to my doll family! Thank you for such an awesome birthday present, Sarah! :D

Thursday, July 5, 2012

My first FFD head, finished!

I finished my first French Fashion doll head!!!


I am pretty happy with how she turned out. I like her in real life better than I like the stock photo on the Bell web site, and I already liked the stock photo, so. . . Good news there! :)

My next steps for her are to make a wig and a body for her. She'll be around 18" when finished, and will have dark blonde hair. I am going to be making the wig! For now, I'm pilfering hair from a cheap Halloween costume wig, but some day, I'll make one in nice mohair.

I'm presently trying to make a final decision on a style. I know for sure that I'm aiming for 1870s, and that I want no bangs, a center part, and then I'll style it somehow at the back. What I don't know is if I want something something that is very simple and pulled back, like the 1870 fashion plate below on the left, or if I want to go for the look with the curls down the back, like the 1874 illustration below on the right. At the moment, I lean more towards the curls-down-the-back. . .


In other news. . . I have no idea what to do next in doll class! I just recently got laid off due to a major workforce reduction at my company, and I am worried about how long it will take me to get another job, and if the severance will last as long as I need it to, and therefore trying not to spend frivolously in any way from now until getting a new job. But, I've paid for classes for the month of July, and it would be silly to not have anything to do all month, so, I think I'll just have to have another doll poured, and suffer the shopper's remorse! But then the next question is. . . Which doll? Hmm. . .

Friday, June 15, 2012

A present for Charlotte. . .

Well, I missed another doll class, this time due to circumstances having to do with re-wiring fun, which I won't bore you with the details of. . . (The joys of owning a 92 year old house, which has much of the same wiring it did the day it was first built!) Anyhow. . . I do have one fun thing to post about, which are these:


They are a pair of antique cut steel buckles that I bought for Charlotte at the Dress U marketplace. A littler closer of a view:


I don't know how old they are, but I feel they have the right look to work with Charlotte's mostly-18th-century wardrobe. I had thought to make them shoe buckles on a pair of shoes I'm daydreaming of making for her. Not sure if they are actually a bit small for that, but I'm going to give it a shot and see if I can make it work!

Monday, May 21, 2012

Review of the Battat / Our Generation Blue Camping Set

Well, I am not going to doll class tonight, because my car is all like "here are some red flashy lights on your dashboard for you to spend your money on!" *rolls eyes* I'm afraid to drive it without having my husband take a look at it. I am clueless when it comes to cars. I can not sew it, therefore, I don't know what to do with it! But one thing I do know about cars is that sometimes if you ignore a problem, you can seize an engine and that costs thousands of dollars to replace, but when you're like nineteen and have no money, that turns in to your Dad selling what's left of the car for parts, and then you have no car, and then your boyfriend has to do all the driving back and forth to hang out, which is like 45 minutes to an hour each way, and then you feel super guilty and hate yourself. Not that I would know from experience, of course. *ahem* (On a brighter note, it didn't scare the boyfriend away, because he's now the husband! And car care-taker of the household cars, which is probably a good idea, in light of my proven lack of ability to look after them!) Anyhow. . .

If this were a normal Monday, and I was missing doll class, I would make an effort to make some sort of doll-related progress - like maybe finishing those underpinnings for Marie Louise! But this is not a normal Monday; rather, it's the Monday that is only a week and a half prior to Dress U, aka my hugest costume event this year. . . And all three of my ensembles for Dress U are in bits and pieces around my sewing room. A bottom for this outfit is done, a top for that one partially done, and patterning for a third is my current adventure. Plus I have half a bonnet and a pattern made for a second. So, I somehow can't spend time in my sewing room and have it be on anything but Dress U stuff without feeling very stressed out! So I'll use my unexpected sewing room time tonight dealing with some of that. . .

But, in the spirit of keeping up with weekly doll babbling, even though I have no progress to report, I present. . .

A review of the "Our Generation" Camping Set! (Yes, I know, I said I was going to post reviews of three OG sets, one per day, for three days. And that was almost a month ago. Oops! Better late than never though, right?) Okay, here we go. . .


As you can see, I went with the blue version. I know this is bananas since I am, like, the queen of pink! But what sold me on the blue over the pink were the accessories. The pink tent looked like it was mostly cooking stuff, where the blue one has a little of that, but also a lantern that really lights up! Plus, my own tent in "real life" is blue. ;)

So first, the accessories. . .


The lid can come off the pitcher, and the marshmallow and hot dog can both be removed from the stick, which is fun. (As I've said before, I always love doll accessories that seem to function or move somehow!) The stick with the hot dog and marshmallow is just too cute! And the lantern - how cute is it that it really lights up?!?


The sleeping bag is just about the right fit for an AG:


It's perhaps a tiny bit short, but if you stuck a pillow under her head, you'd never know it. It feels like sleeping bag material, but is pretty thin. I don't think Mia should rely on it for warmth, should she decide to go on any cold-weather camp-outs. However, she should be just fine posing for silly photo shoots for me in it. ;)

And now, the tent. . .

It folds up for easy storage, and the ties that can be used to hold open the doors also act to hold it tied together when collapsed, which is neat (if you can remember how to refold it properly):


I had heard horror stories about the poles not being flexible enough to be used for the tent, and when I checked them out in person, I thought I was going to have that problem as well, because they seemed seriously not bendy! But, with a little help from my husband, we got it assembled. It doesn't look exactly like the stock photo on the OG web site, but, it's functional.


Taffy would like you to know that it is kitty-sized, and very fun to sit in and peek out of the doors and windows at your humans. ;)

Anyhow. . .

The doors velcro shut, and can be tied back if you wish to keep them open.


Mia got right in to try it out, and make sure she would fit length-wise. . . She does - but only just. And I'm sure one could fit a second doll in beside her, but not with much space left over. I feel this is authentic, since every tent I've ever owned has only just barely fit the number of people it claims to! ;)


The final verdict: Adult help is definitely required for assembly, and indeed even as an adult myself, it was easier with two of us working it. Assembly aside. . . The set is adorable, and I would have LOVED IT as a kid, to take with me on the family camping trips. What fun would that have been?!? I give this set an A!

Wednesday, May 16, 2012

Two hour lashes.

Just my weekly post-clast update here. . . This week? Upper lashes. That's right, a two hour class, and all I did was upper lashes. Well, not quite two hours; I left 15 minutes early and of course didn't start the minute I walked in! Anyhow. I definitely feel I'm getting more comfortable with lash-making, in that it doesn't feel so foreign holding the brush/scary trying it, however, I still struggle to properly slant my lashes! But in the end, I got results that satisfy me. For now. I might go back and add some more lashes nearer the corners of the eye, because while they looked "done" to me in class, now that I see them again, I think they might need it. . .

Sunday, May 13, 2012

Brimfield haul!

I am SO excited because I just got back from a long weekend at Brimfield (among other adventures) and I am pretty sure I just purchased my very first antique china head!!! Unfortunately, she looks like the victim of some sort of horrific accident. But she's in luck because she landed in the hands of an apparent dollmaker! ;)


Here's a close-up of her pretty face (which I hadn't yet cleaned for these pictures):


She looks "right" to me. She doesn't have that mid-20th century-style facial features that the repros of that era seem to have, she's obviously got signs of wear (including a break in the back of her shoulder plate which was glued together a loooooong time ago), and her body looks like it's pretty old. I peaked in to see her stuffing where her left leg was, um, amputated, and I see she is stuffed with straw, which would be correct. I really think I might have the real deal here!


She had this little "recycle?" note pinned to her bum, (along with her price, but I was only charged $16 as she was on sale 20% off). I don't know what they mean by "recycle," but my plan is to try to find a similar size (she stands about 10 3/4" tall) and style repro doll mold from which I can make some replacement arms/legs at my studio. I'll leave her head/shoulder plate just as is, and I'll even try not to alter her body, because I think that's holding up pretty well.

Anyhow. I'm pretty excited about this! My first true antique doll, plus, I have the fun of hunting down a mold that will work for repalcement arms/legs, and then I will get to make those, and have the thrill of giving this sweet little doll a second chance at life. ;)

Also, while I haven't chosen a first name for her yet, Glenn says her last name is "Ramshack," due to me referring to her as my "silly little ramshackle doll purchase." ;)

Now, on to the Brimfield finds!

First up, a $5 tea set:


So apparently, I now collect doll tea sets. I didn't do this intentionally, but I seem to be a sucker for them! I now have. . . Let's see. . . I think seven of them? Plus a few vintage or antique single pieces of tea sets. A lone pot here, a cup and saucer there. What is wrong with me?!? Ha ha ha. . .

Next, this desk:


It needs some TLC, but for the price I paid I think it's a bargain! It weighs a ton and the size is exactly right for the AG crew, and it looks suspicially like the official Samantha desk. The pattern of the wrought iron bits is right, the wood bits look correct, and in fact everything seems to indicate a potential official AG item here except two things: first, that it does not have the "PC" markings on the wrought iron bits, and second, that there are screws holding the bit of wood at the front on (what would have been the back of the chair in front). I've seen the Pleasant Company version of the desk and know it should have both of these features. What I don't know is what changes Mattel may have made. So, I either have Samantha's desk, or a decent knock-off. I'm going to take it apart, clean it, and probably refinish the wood bits. Another fun project! I do love finding things I know I can fix up.

And finally, how my heart stopped when I saw this lovely doll couch!


Most of the time, the doll furniture I find is so clunky, as it's made to be knocked about during play, or it's intended for dolls like the AG crew. This is isntead incredibly delicate and lightweight. It has wear here and there, but I think it's in pretty good condition. And, it fits Fanny perfectly!


How lonely Fanny looks sitting there by herself. I think I might need to make her a friend!

Well, one thing is for sure: I am not in danger of running out of fun things to do in the doll studio - or in my doll/sewing room! ;)